
3 Plant mistakes to avoid by refreshing your plant’s soil yearly! And a step-by-step guide to repotting your plants.
You want the best for your plants and we do too.
In order to keep your plants happiest we recommend refreshing the soil of your plants every year or so.
It is also a good idea to refresh the soil of any new plant you bring home.
Goodbye old mystery soil and hitchhiking pests!
Here are the three plant killer mistakes you can avoid by refreshing your plant’s soil:
Mistake #1 - Nutrient Depletion
After time, soils are naturally stripped of some of their nutrients by the plants and by watering.
This is why people use fertilizers, right?
BUT the problem with fertilizers is that they can be complicated and even damage plants, especially if used incorrectly.
We like to keep everything very simple and closer to the natural environment of a plant.
And since there are many other benefits that come from refreshing the soil, we prefer to go that route instead.
Mistake #2 - Compacted Soil
Soil naturally becomes compacted over time from watering, drainage, temperature, etc.
This can cause soooo many problems for plants.
Compacted soil does not allow for as much oxygen to reach roots, It can make it difficult for roots to stretch and grow, and it can hold water against the roots causing root rot.
And cheap soils with fine dusty dirt, perlite, and (sometimes even mulch) can lead to compaction much quicker than high quality soil and can even be packed so tight that water will no longer penetrate the soil - making it hard for water to reach the roots as well!
Plant Lab Tests: We have run tests in our greenhouse where we water big box plants with compacted soil with plants in our soil at 1 and 2 years old. The big box store plants in the heavily compacted soil could no longer take in water below the first ¼ inch. Whereas the other plants were all fully saturated.)
Plants need rich, fluffy, and well draining soil indoors
We make our soil in small batches using the highest quality materials for the specific needs of each plant, full of nutrients, and remain fluffy and well draining far longer than any soil we have tested.
Mistake 3 - Never checking the plant below the soil
Giving your plants fresh soil yearly, is a great way to regularly assess your plant and its roots to check for signs of over or under watering.
Here is a step by step guide to repotting your plants and what to look for when you check your plant closely out of the soil!
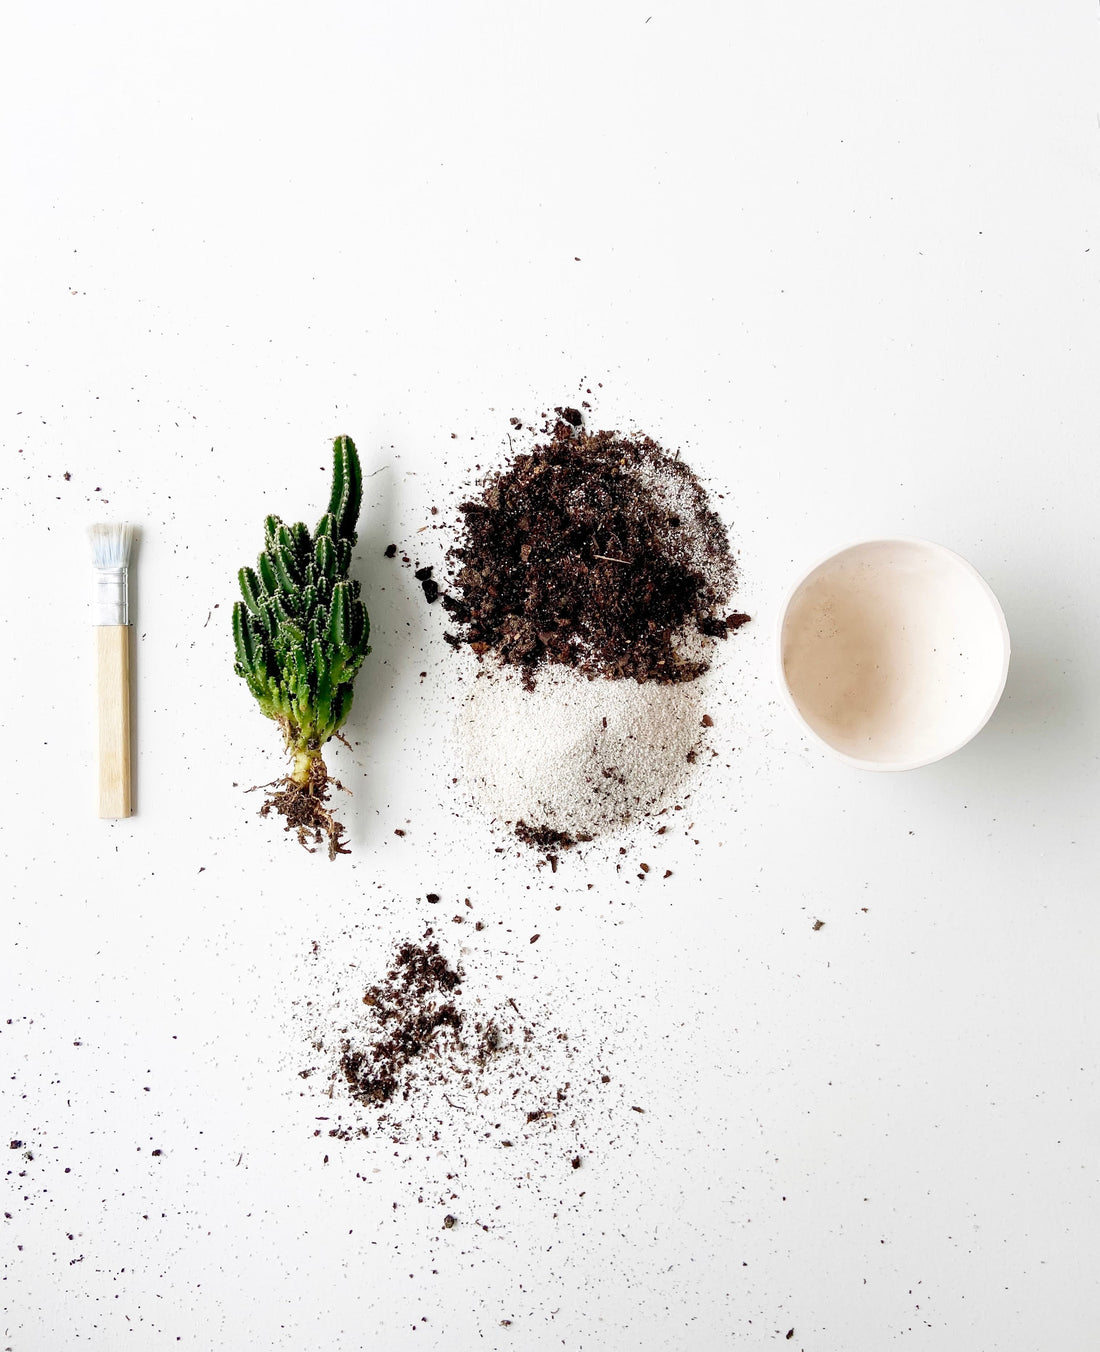
Step by Step: How to Refresh your Plant's Soil and Check the Health of the Plant
1. Gently remove your plant from the planter and place the planter aside in a clean spot.
We recommend doing this into a container or on a plant tarp like the one in our shop.
2. Dump the old soil.
You will want to get rid of the old soil and sand. It is not a good idea to reuse old soil! Reusing old soil takes away any benefits of refreshing the soil and it can transfer plant problems.
To avoid the landfill, you can throw the used soil outside or add it to a compost bin!
3. Wash your planter.
Use either a brush to clear off the debris left in the planter or a light soap to clean it a little deeper.
We designed our planters after lots of research to best replicate the natural environment of each plant. Our cactus and succulent planters are finished differently from our houseplant planters to address the plants needs, though both have a matte finish.
We make our planters with a unique finish to be glazed but still absorbent like terracotta. Our planters are designed to hold exactly the right amount of water for the plant it comes with in the plant kit and so that you never have to up-pot to a larger size.
4. Check the plant.
Look for any signs of overwatering like darkness or for signs of under watering like wrinkles. Make sure the roots are strong and that they’re not mushy from too much water or breaking off dry from underwatering.
Prune any necessary spots on houseplants. If the roots of your plant are very long you can trim them down to fit well inside your planter again.
If you aren’t sure what you are looking for, checkout our blog to figure out What Your Plants Are Trying to Tell You.
5. Brush or wash away any old soil from roots so they can have full contact with the new soil.
Our soil does not clump as much as others. We formulate our soil to be high in nutrients, drainage, and air flow.
If you are saving/refreshing a plant that is not ours, most cacti and succulent soils are so dusty and fine that they slide out of the growers cup as one solid dust rock. This soil holds water against the roots of the plant and causes root rot. Gently use water to remove this old soil because it is very dusty and will get into your nose and mouth.
6. Grab your clean planter or new planter to re-pot.
If you are repotting one of our plants in our planters, you can use the planter you cleaned in step three! If you are saving a plant and need a new planter, find our planters without plants *here*, one of our Save a Plant Kits here or make sure to always use a terracotta planter that is the correct size.
You don’t necessarily have to up-pot or go larger. Repotting your plant into a bigger planter just because it has lots of roots can cause overwatering since the more soil a plant has in its planter, the more water it holds and is consumed by roots.
7. Gather fresh soil.
We mix our own soil that is great for cacti, succulents, or low maintenance houseplants since these plants do not need to be moist constantly.
We also use a special white sand for cacti and succulents that slowly releases the water to the roots of the plant and prevents pests from moving into the soil of the plant.
You can find our soil and sand by clicking *here*
8. Add soil to the bottom of the planter.
You want to add enough soil so that the roots of the plant will not touch the bottom
- but - the plant will still have space and won’t be too far above the lip of the planter.
9. Add the plant.
Hold the plant where you want it in the planter. Make sure it is deep enough that the plant won’t fall over
-but-
that the main body of the plant is above the soil enough to not have water sit in too many of the crevices of the plant.
10. Add soil around any roots still visible and the base of the plant.
11. (Optional) Top the plant with our special sand.
This step is optional but we highly suggest it for cacti and succulents. Our specialty sand slowly releases water to the roots of the plants, prevents pests, and gives a clean minimal look.
This method is a simple and great way to refresh plants you have or to attempt to save a plant. Studies show that caring for plants makes us feel happy, fulfilled, and relaxed. And that looking at plants makes us more focused and calm.
If you have any questions about repotting your plant, email us at care@tierrasolstudio.com
xo, Seana
P.s. You can find our soil here and plant tarps for easier clean up right here!